Wednesday 25 December 2013
Merry Christmas and a happy New Year!
To everybody that follows my blog thank you so much for taking an interest in what I do and I wish you all the very best for Christmas and the New Year.
Saturday 16 November 2013
Meng T-90 tracks
Okay I've heard a few stories about the tracks in this kit and how tricky they are to put together however I've found that if you DON'T use the supplied assembly jig things go a lot faster. I can see what Meng are getting at assembly wise but making the links up as per the instructions like this;
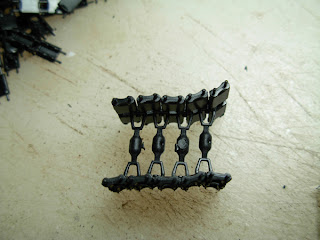 makes it awkward to remove the bit of sprue between the guide horns, then you fit the links between the two halves of the assembly jig, fit the end connectors into the other jig, remove THAT sprue then fit the connectors to the end of the links. Personally I think it's a lot easier to do it like this;
 Seperate the guide horns, clip them to the links, push the end connectors onto the end of the link THEN cut off the sprue. Much faster!
One thing I WILL say is the track is very similar in construction to the AFV Club individual tracks I used for my M728 CEV (with the exception of the vinyl end connectors) and I would STRONGLY advise not to use
white spirit/enamel thinners during the weathering stage as this made the track link end connecting pins very brittle and the tracks just fell apart. The AFV Club end connectors were styrene and they split too but the vinyl ones in this kit should fare better (hopefully). Either way I'll use IPA (IsoPropyl Alcohol) when applying weathering powders to the tracks.
More later!
Edit!
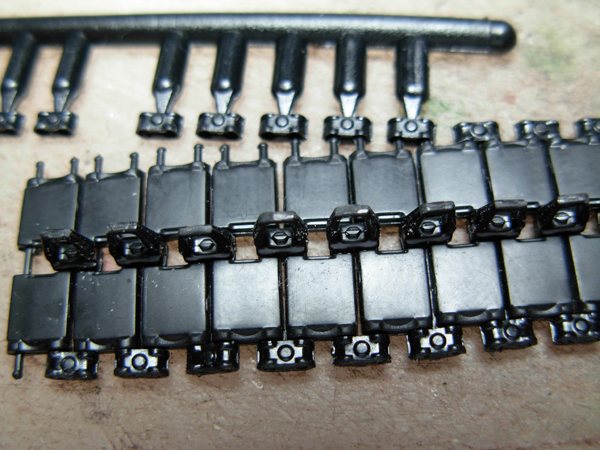
Hot off the bench we have a complete run of track for one side;

OK the way to do it is this;
(1) Unlike what I said above assemble the guide horns and links as per instructions (and in the top picture) however don't stop at five links, just carry on for at least twenty or thirty.
(2) Cut off the connecting sprue between the guide horns using a block to support the links (I used a wooden clothes peg).
(3) Lay the links flat on the bench and press the vinyl end connectors onto the pins four or five at a time (taking note which way up they go).
(4) Cut the vinyl end connectors from the sprue and there you have it. Job done! No need for the supplied assembly jig either.
Meng recommend 81 links in the instructions which is what I've done and it does'nt seem to be pulling the sprocket and idler in odd directions (which can happen sometimes).
Time-wise I reckon it has taken me about four or five hours from removing and cleaning up the links from the sprue to final assembly, also the way they go together means I can paint them seperately and feed them through behind the side skirts when the model is finished.

One thing I WILL say is the track is very similar in construction to the AFV Club individual tracks I used for my M728 CEV (with the exception of the vinyl end connectors) and I would STRONGLY advise not to use
white spirit/enamel thinners during the weathering stage as this made the track link end connecting pins very brittle and the tracks just fell apart. The AFV Club end connectors were styrene and they split too but the vinyl ones in this kit should fare better (hopefully). Either way I'll use IPA (IsoPropyl Alcohol) when applying weathering powders to the tracks.
More later!
Edit!
Hot off the bench we have a complete run of track for one side;

OK the way to do it is this;
(1) Unlike what I said above assemble the guide horns and links as per instructions (and in the top picture) however don't stop at five links, just carry on for at least twenty or thirty.
(2) Cut off the connecting sprue between the guide horns using a block to support the links (I used a wooden clothes peg).
(3) Lay the links flat on the bench and press the vinyl end connectors onto the pins four or five at a time (taking note which way up they go).
(4) Cut the vinyl end connectors from the sprue and there you have it. Job done! No need for the supplied assembly jig either.
Meng recommend 81 links in the instructions which is what I've done and it does'nt seem to be pulling the sprocket and idler in odd directions (which can happen sometimes).
Time-wise I reckon it has taken me about four or five hours from removing and cleaning up the links from the sprue to final assembly, also the way they go together means I can paint them seperately and feed them through behind the side skirts when the model is finished.
Wednesday 13 November 2013
Meng 1/35 T-90
I made a start on the model last week and so far so good, the fit of parts up to this point has been very good
although I can't help think the torsion bars won't stand up to much stress due to the fairly soft plastic;

 The tracks are next to put together and apparently they are a REAL chore to assemble according to some who have built the model so we'll see how it goes.
although I can't help think the torsion bars won't stand up to much stress due to the fairly soft plastic;


Sunday 10 November 2013
Scale Model World, Telford 2013
Well that's another show done and the final one of the year (for me anyway). As usual it was great to meet up with old friends but also to make new ones and be able to spend a bit of time chatting with some of my model making heroes such as Franck Oudin, Akos Szabo, Spencer Pollard and Spud Murphy. I shake their hands but the magic they have still does'nt bloody rub off on me :o)
Also it was a privilege talking to the proprieter of Wingman Models, Andreas Klein as he was a former Phantom pilot with 3000 hours in the German Luftwaffe (even though their boxing of the new Kinetic Alpha Jet cost me a lot LOL).
I did'nt get to see the competition (again) but if some of the stuff on the club tables is anything to go by then it must have been outstanding plus I'll wait for the pictures to show up on the net.
Personally I spent an absolute fortune but as they say you can't take it with you so what the hell. SMW is a great place to bag some stuff at good prices such as a set of Fruilmodel tracks for £18 instead of over £30 (I got tracks for the Tasca Luchs and SA-6 Gainful) and it is REALLY hard to resist a lot of the things on offer.
Anyway here's a few pics of what caught my eye during the weekend as I was mostly yapping with other modellers to take hundreds of photographs;
The test shot for the new Revell 1/48 Tornado;

David Parkers' (Editor of AFV Modeller magazine) Meng Models A-39 Tortoise


And his cut-up T-62;

Don't know who built this 1/16 King Tiger but it was lovely;

The USAF Special Interest Group and their display;
 The Zoukei Mura stand;
 Spencer Pollard showing his beautiful 1/32 Tamiya F4 Corsair;

 580 Modellers display of Starfighters (mines the middle one);


Malc Ireson's VERY nicely done 1/32 Tamiya Corsair;

The Airfix 1/24 Hawker Typhoon...simply beautiful;


Finally a real live UH-1C 'Huey';

Also it was a privilege talking to the proprieter of Wingman Models, Andreas Klein as he was a former Phantom pilot with 3000 hours in the German Luftwaffe (even though their boxing of the new Kinetic Alpha Jet cost me a lot LOL).
I did'nt get to see the competition (again) but if some of the stuff on the club tables is anything to go by then it must have been outstanding plus I'll wait for the pictures to show up on the net.
Personally I spent an absolute fortune but as they say you can't take it with you so what the hell. SMW is a great place to bag some stuff at good prices such as a set of Fruilmodel tracks for £18 instead of over £30 (I got tracks for the Tasca Luchs and SA-6 Gainful) and it is REALLY hard to resist a lot of the things on offer.
Anyway here's a few pics of what caught my eye during the weekend as I was mostly yapping with other modellers to take hundreds of photographs;
The test shot for the new Revell 1/48 Tornado;

David Parkers' (Editor of AFV Modeller magazine) Meng Models A-39 Tortoise


And his cut-up T-62;

Don't know who built this 1/16 King Tiger but it was lovely;

The USAF Special Interest Group and their display;


Malc Ireson's VERY nicely done 1/32 Tamiya Corsair;

The Airfix 1/24 Hawker Typhoon...simply beautiful;


Finally a real live UH-1C 'Huey';

Thursday 7 November 2013
Tamiya Fw190F-8
This one was started a long time ago and before the household makeover I decided to finish it off. After the last bits were glued on I sprayed it with primer then put it back in the box until today when I decided to spray the undersurface colour...unfortunately I forgot to fill a few gaps beforehand, especially around the cowling;


D'OH!!! THAT'S what I should have done before painting it but forgot all about it...bugger.
Oh well I'll have to get the Milliput out and do some filling tonight. Silly old duffer! :o)


D'OH!!! THAT'S what I should have done before painting it but forgot all about it...bugger.
Oh well I'll have to get the Milliput out and do some filling tonight. Silly old duffer! :o)
Saturday 2 November 2013
T-26....will it be finished for SMW at Telford? (part 2)
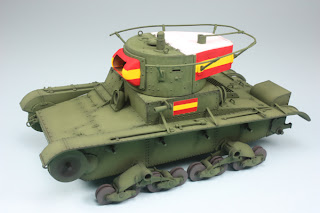
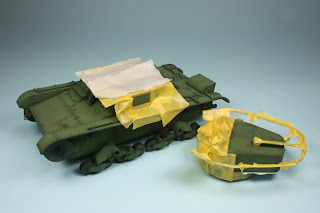
Pfffffft of COURSE it will! In fact here ya go;


 I was aiming for a dusty rather than the 'caked in mud' look to it due to the model depicting a machine from the Spanish Civil War. I THINK I have achieved that but what the hell, I quite like the way it's turned out and I hope you do too.
Anyway what's next on the bench...hmmm....well it will be another Russian tank but somewhat bigger and a bit more up to date, something along the lines of this;
 Oh yes! I can't WAIT! :o)


Anyway what's next on the bench...hmmm....well it will be another Russian tank but somewhat bigger and a bit more up to date, something along the lines of this;

Friday 1 November 2013
T-26....will it be finished for SMW at Telford?
Seeing that the show is exactly one week away at the time of writing I'm throwing various weathering products at it BUT instead of building up layers of mud I want a more dusty appearance, due to the fact it's a Spanish Civil War example so we'll see what it looks like.
Will it be finished in time? Stay tooned folks :o)
Will it be finished in time? Stay tooned folks :o)
Monday 28 October 2013
A good discovery
I've just matted down the T-26 and for this I used Winsor and Newton acrylic matt varnish from their Galeria range. Now I've been using distilled water to thin the stuff and getting mixed results such as it drying patchy or getting 'spiders legs' when I sometimes get too close to the model or just a general dissatisfaction with spraying water-based stuff in general.
Anyway I decided to to thin it with IPA (Isopropyl alcohol-the 70% stuff) this time to see what happens, fully expecting the IPA to turn the varnish into jelly (which can happen with some acrylics) BUT it mixed very well and after testing on a scrap model the varnish dried evenly and most important of all very matt.
After all the issues I've had with matt varnish frosting over the past year I'm glad to say I seem to have finally cured the problem.
I did try the gloss varnish from the same range and although it dried VERY shiny it was'nt touch dry for some time so for now I'll stick with Tamiya X-22.
The ONLY downside to the Galeria varnish is that it is'nt very durable and does'nt take handling very well but that's a price I'll pay for a decent matt finish plus latex gloves help a lot when handling a model anyway.
Friday 25 October 2013
Reworking a halftrack part 2
I'm calling this done after throwing various weathering products at it. Better than the first time around?


At least I now have something else for the 580 Modellers table at Telford :)


At least I now have something else for the 580 Modellers table at Telford :)
Wednesday 23 October 2013
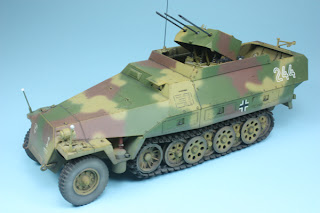
Reworking a halftrack
Acutely aware that I've got bugger all new to put on show at Telford I remembered this model I did a couple of years ago, Dragons' Sd.Kfz 251/21D. Looking at the model it's not THAT bad but it needs some tweaking SO I've decided to add more weathering to jazz it up a bit. Anyway here's a couple of 'before' pics;


 I'll post some pics when it's done.


Sunday 20 October 2013
More T-26
Well I've had a very productive weekend masking and painting the T-26 and here's where it is so far;

 I'm VERY pleased to have been able to get to this stage AND not rip off the antenna around the turret when removing the masking. With a bit of luck I may get this finished for Scale Model World in Telford next month but we'll see as I'm not rushing it.


Saturday 19 October 2013
Meanwhile back to the T-26...
I've masked off the areas ready for the Nationalist markings on this model and as white is on the turret top I'll spray it on the turret and hull sides for the red and yellow stripes as it will act as an undercoat.
 Hobbyboss only supply decals for the hull sides and it will be virtually impossible to match the colours on them with the turret so I may as well paint these at the same time.
I'll be using Humbrol acrylic white number 34 as it's FAR easier to spray than Tamiya XF-2 white, I usually have a LOT of hassle getting the stuff through the airbrush yet other Tamiya colours are fine to use. Odd!
Edit; I used Mr Hobby Aqueous white instead as the Humbrol was very poor covering. Funny really as it did the job on my Ju87B in winter camo...f*****g acrylic paint....you have to be some sort of alchemist to make them work (a drop of flow improver here, two drops of retardent there, eye of newt and wing of bat etc etc etc)
Wednesday 9 October 2013
British Hussar update
Painting figures like this can be a challenge, mainly due to the fine uniform details and this one is no exception. I looked at various tutorials about painting gold wthout actually using gold paint but they went straight over my head so I've decided to use gold oil paint.
I was'nt sure how to go about it but after a request for help to reknowned figure painter Dave Youngquist on the Michigan Toy Soldier Youtube channel he very kindly emailed me some hints and tips so here it is so far;

 I'm actually quite pleased with the results so far :o)
I was'nt sure how to go about it but after a request for help to reknowned figure painter Dave Youngquist on the Michigan Toy Soldier Youtube channel he very kindly emailed me some hints and tips so here it is so far;


Sunday 6 October 2013
Euromilitaire inspiration.
I've never been to the show but the standard of work on display and published in magazines over the years and more recently the web has always inspired me. I've always had a love for figure painting as it was one of the first things I did when starting this modelling lark MANY years ago and although I'm nowhere near the standard of what's out there it's an aspect of modelling I do enjoy.
So this leads me to a 90mm British Hussar figure I painted years ago and last year deciding to strip the paint off and redo it (see my earlier blog post about it here), only to get as far as painting the Dolman and Pelisse in blue and watching the Vallejo paint dry with a glossy sheen. This absolutely kills a model figure so after trying to matt down the blue and repainting it still did'nt work so in frustration I put the figure away. Later last year I bought some Lifecolour paint which for me was awful stuff (I know some modeller swear by the stuff, I just swore AT it) so that was that until I saw the Euromilitaire pics last month and had the inspiration to paint a figure.
I bought the Andrea Blue Paint Set last week, got the Hussar figure out of it's hiding place and FINALLY I have a nice and matt blue uniform;
 Obviously this is the basic uniform as I've got a LOT of gold braiding to paint but I'm pleased the Andrea stuff has worked AND it's nice to paint with too, so much so I've ordered a couple of more colours to try.
Funnily enough I'm contemplating going back to enamel paint for figures now that Humbrol have brought production back the UK as these were the paints I used long before acrylics took over. The only reason I stopped using them was that the quality had deteriorated and it was like painting with treacle, this was due to the fact Humbrol had switched production to China a few years ago having closed the old Hull factory to cut costs.
I do paint aircraft and tanks in acrylic (usually Tamiya or Mr Hobby) but for the life of me I cannot paint a face with the stuff and have the utmost respect for those that can so I prefer to paint faces in oils, using acrylic for the uniforms and detail. However now that Humbrol paint is back I have a few of the new tins to try as for me blending the paint for shadows and highlights was FAR easier with enamel due to the longer drying time plus I used to use Sepia oil colour for deep shadows and it just does'nt work with acrylic (an oil and water thing see).
So this leads me to a 90mm British Hussar figure I painted years ago and last year deciding to strip the paint off and redo it (see my earlier blog post about it here), only to get as far as painting the Dolman and Pelisse in blue and watching the Vallejo paint dry with a glossy sheen. This absolutely kills a model figure so after trying to matt down the blue and repainting it still did'nt work so in frustration I put the figure away. Later last year I bought some Lifecolour paint which for me was awful stuff (I know some modeller swear by the stuff, I just swore AT it) so that was that until I saw the Euromilitaire pics last month and had the inspiration to paint a figure.
I bought the Andrea Blue Paint Set last week, got the Hussar figure out of it's hiding place and FINALLY I have a nice and matt blue uniform;

Funnily enough I'm contemplating going back to enamel paint for figures now that Humbrol have brought production back the UK as these were the paints I used long before acrylics took over. The only reason I stopped using them was that the quality had deteriorated and it was like painting with treacle, this was due to the fact Humbrol had switched production to China a few years ago having closed the old Hull factory to cut costs.
I do paint aircraft and tanks in acrylic (usually Tamiya or Mr Hobby) but for the life of me I cannot paint a face with the stuff and have the utmost respect for those that can so I prefer to paint faces in oils, using acrylic for the uniforms and detail. However now that Humbrol paint is back I have a few of the new tins to try as for me blending the paint for shadows and highlights was FAR easier with enamel due to the longer drying time plus I used to use Sepia oil colour for deep shadows and it just does'nt work with acrylic (an oil and water thing see).
Tuesday 1 October 2013
T-26 with paint on
After undercoating with Games Workshop Chaos Black I used Tamiya XF-26 Deep Green for a base colour and lightened it with XF-60 Dark Yellow. It's probably NOTHING like Russian 4BO green but I'm happy with it, all I have to do now is mask off the white, yellow and red bits for the Spanish Civil War markings.


Tuesday 24 September 2013
Hobbyboss T-26 built
Well that did'nt take long! To be honest I've had a couple of days off from doing the house (the doc DID say rest) soooooo I've cracked on with the model. It just needs some attention around the turret then it'll be given a wash down and undercoated.
Again it's a lovely little model and just needs a few tweaks so well done Hobbyboss. :o)


Again it's a lovely little model and just needs a few tweaks so well done Hobbyboss. :o)


Wednesday 18 September 2013
Hobbyboss 1/35 T-26
I received this kit for review a couple of months ago and I was quite taken with it so instead of it ending up in the stash I've made a start on it, mainly because it's small and I'm working in an area the size of fold-up camping table.
It's going well so far but OMFG those tracks!!! The track links are VERY small and Hobbyboss will have you fix them together with two VERY tiny pins either side, so having spent the best part of two evenings to put them together and watching them fall apart every time I moved them I've glued them all together and also glued them around the drive sprocket and rear idler with the track pins going in last. They are not glued to the return rollers or road wheels so hopefully I'll be able to remove the tracks for painting meanwhile I'm leaving them for a good couple of days to set, also I've used CA glue to add some strength in places as they can still come apart very easily. Apart from that it's a lovely little model :o)
I did say to myself this would be an OOB build but I am weighing up adding an interior as I have some reference for it via the WWP book, it depends on how the build progresses and my boredom threshold :o).

Saturday 7 September 2013
10,000 views!
Unbelievable! Thank you so much for taking an interest in what I do, it's quite humbling to know that so many people have looked at this blog. Hopefully when I've finished messing about with my house I'll be able to get some models built and put on here for your perusal :o)
Tuesday 6 August 2013
Hobbyboss 1/35 Panhard EBR-11 done.
Finally I've been able to put this one to bed so with a bit of luck the full build article may appear in a future issue of Model Military Int'l. On the whole a nice little kit and it's certainly a different looking vehicle.


Tuesday 30 July 2013
Academy 1/35 AH-1W
I found this while trawling through the Hyperscale galleries;
http://www.hsgalleries.com/gallery04/ah1wak_1.htm


I built it about ten years ago but forgot all about it after it was put in a box then eventually given to a mate of mine. I still have the other decal options somewhere....hmmmmm..... might be time to revisit this one sooner or later.
http://www.hsgalleries.com/gallery04/ah1wak_1.htm


I built it about ten years ago but forgot all about it after it was put in a box then eventually given to a mate of mine. I still have the other decal options somewhere....hmmmmm..... might be time to revisit this one sooner or later.
Subscribe to:
Posts (Atom)